
This guide was first published in 2009 by WorkCover NSW.
This revised edition, published September 2017, has been updated to reflect changes in NSW Work Health and Safety legislation (WHS legislation).
During construction work, inadequately secured masonry walls (brick or block) can fail due to side loads on the walls, the rate of construction, inadequate foundations or adjacent excavations. Side loads may include wind, inadvertent impact with the walls or leaning materials against them. Such failures can result in serious injuries or fatalities.
Persons are exposed to risk when entering the potential fall zones of incomplete or inadequately secured masonry walls. Potential fall zones include adjoining properties or public areas where there is a risk of the wall falling beyond the construction site.
Persons Conducting a Business or Undertaking (PCBU’s) must manage the risks associated with masonry wall construction to ensure the health and safety of their workers and others.
The safety of masonry walls can be improved during construction work with good planning and preparation, risk management and (where required) temporary supports.
Temporary supports – e.g. braces – are often required until the wall is incorporated into the completed structure and/or the wall has gained sufficient strength to withstand the loads applied to it.
Whilst principal contractors and masonry contractors are primarily responsible for the masonry work on site all PCBUs have an obligation to ensure their workers are not placed at risk.
As part of the planning and preparation principal contractors and masonry contractors should:
If you’re a masonry contractor, you must also prepare a safe work method statement in consultation with workers and get it reviewed by the principal contractor before you start work. Ensure that you use any relevant information from the manufacturer, supplier and site management.
PCBU’s, including principal contractors and masonry contractors, are responsible for identifying hazards associated with masonry wall construction, such as unplanned collapse.
Factors to consider include :
| Description | Wind gust speed | Wind characteristics | Recommended actions |
|---|---|---|---|
| Low winds | 0-19 km/h (0-11 knots) | Small branches and dust not moving | Safe to build masonry wall up to heights in table 2. Brace walls, then masonry work may continue if wind is not likely to increase |
| Moderate winds | 20-29 km/h (12-16 knots) | Raises dust and loose paper; small branches are moving | |
| Fresh winds | 30-39 km/h (17-21 knots) | Small trees begin to sway; crested wavelets form on inland waters | Stop all masonry work at heights above the fresh wind heights in table 2 and brace walls |
| Strong winds and higher | over 39 km/h (over 21 knots) | Large branches in motion; whistling heard in overhead power lines; umbrellas used with difficulty | Stop all masonry work and establish a no-go zone around masonry walls |
Source: Based on the Beaufort Wind Scale.
Note: Assess the wind speed at the wall location
| Type | Width in mm | Maximum unsupported wall height (mm) Low to moderate winds | Maximum unsupported wall height (mm) Fresh winds |
|---|---|---|---|
| Brick | 90 | Single skin 1500 Cavity 2100 | Single skin 750 Cavity 1050 |
| 110 | Single skin 1800 Cavity 2500 | Single skin 900 Cavity 1250 | |
| Block | 90 | 1050 | 525 |
| 140 | 1600 | 800 | |
| 190 | 2500 | 1250 |
Note: This table is based on a maximum spacing of 3 m between supports, and applies to standard-weight extruded or pressed-clay bricks and hollow-core concrete blocks. Lower heights apply for lighter weight bricks or blocks – seek engineering or manufacturer’s advice.
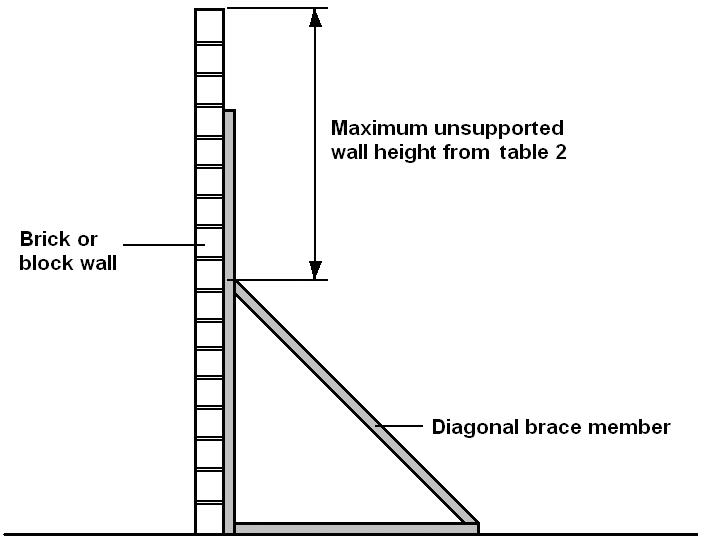
Note 1: The upright member above the diagonal is ignored, as it may not be rigid enough to provide support. If the brace was not in place, the maximum unsupported wall height from table 2 would apply from ground level.
Note 2: Unless the brace is structurally connected to wall near the top of the diagonal, usually a through connection with plate on the far side, it is only preventing the wall falling toward the brace and another brace may be required on the other side of the wall.
A risk assessment considers the severity of any injury or illness that could occur and the likelihood or chance that someone will suffer an illness or injury. The risks associated with masonry wall construction are typically high due to the severity of the injuries that could occur.
Under the WHS Regulations, a risk assessment is not mandatory for construction work except for specific situations. However in many circumstances a risk assessment will assist in determining the control measures that should be implemented.
It will help to:
A risk assessment is not necessary if the risk and how to control it is already known.
Having identified the hazards and assessed the risks, you must manage those risks by implementing control measures. Risk control measures may include:

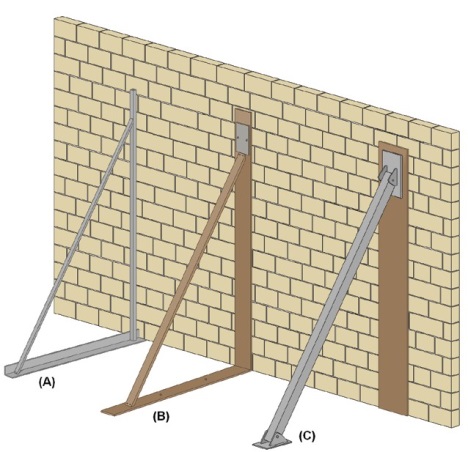
(A) Metal triangular brace
(B) Timber triangular brace
(C) Metal prop brace
Ensure that any no-go zone extends – at right angles to the wall on both sides – a least the distance equivalent to the total unsupported wall height plus 1.2 m.
If winds exceed ‘fresh winds’ (see table 1), establish a no-go zone – regardless of any wall supports already in place.
Consider individual no-go zones for each wall, isolating specific areas or isolating the entire site.
Do not let anyone within the no-go zones.
A no-go zone can be removed once the reason for it no longer exists, eg - wind no longer exceeds ‘fresh winds’.
Note: You may need no-go zones for issues other than masonry wall failures eg - for falling objects.
The control measures used, e.g. temporary supports, must be monitored and reviewed to make sure they remain effective. Walls and temporary supports should be inspected for damage and/or movement on a regular basis, typically at the start of each day and after adverse weather conditions. If repairs are required, maintain no-go zones until it is safe to approach.
When reviewing control measures, the SWMS must also be reviewed and revised where necessary.
If problems are found, go back through the risk management steps, review your information and make further decisions about control measures.
Temporary supports must be maintained until the wall is incorporated into the completed structure or alternative support is provided e.g. a cross wall.
Contributors to the 2009 edition of this guide included:
masonry wall safety during construction work
This guide was first published in 2009 by WorkCover NSW.
This revised edition, published September 2017, has been updated to reflect changes in NSW Work Health and Safety legislation (WHS legislation).